目的
目的是在Ubuntu 18.04上安装Go。 Go也称为Golang,是Google开发的一种开源编程语言。
本指南将向您展示如何使用标准Ubuntu存储库在Ubuntu上安装Go。apt命令和使用Google的Golang安装程序以及如何使用snap命令。
操作系统和软件版本
- 操作系统:-Ubuntu 18.04仿生海狸
- 软件:-go版本go1.10 linux /amd64或更高版本
要求
以root或通过特权访问Ubuntu系统sudo命令是必需的。
约定
本教程的其他版本
使用说明
安装先决条件
要安装和测试Go,我们需要以下内容linux命令s:wget和git。这些工具很可能已经在您的Ubuntu系统上安装了。如果不是,请运行:
$ sudo apt install wget git
使用Golang安装程序安装Go
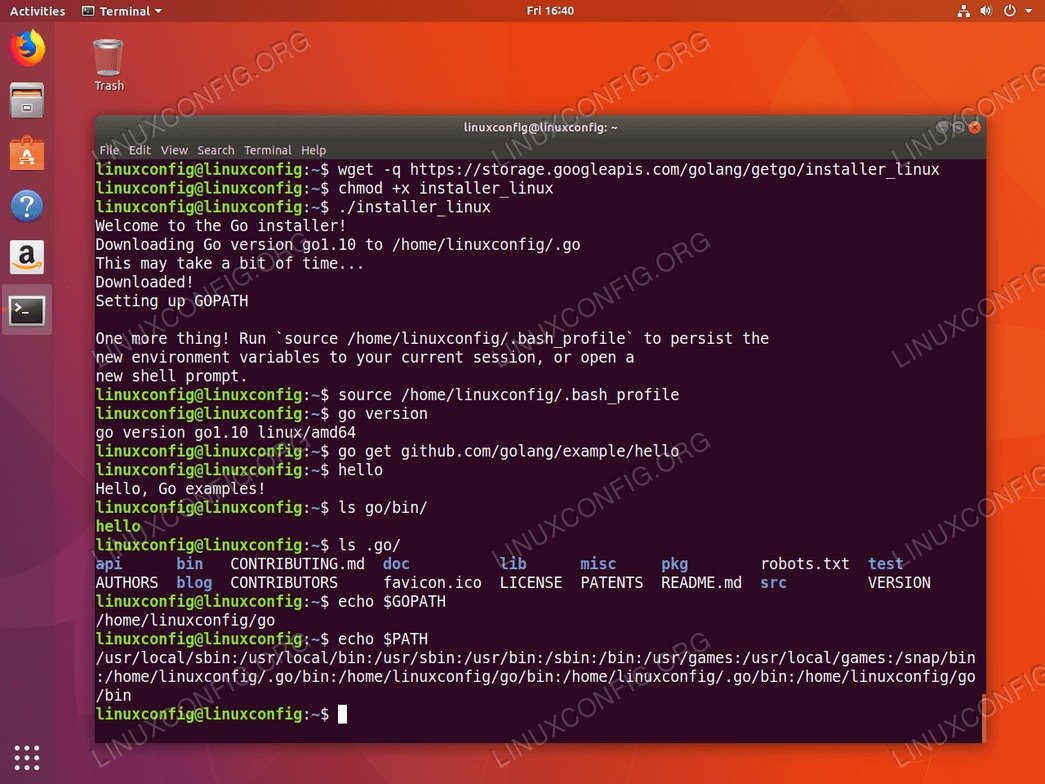
使用Google的golang安装程序最有可能是在Ubuntu系统上安装Go的最便捷方法。让我们从下载Golang安装程序开始:
$ wget -q https://storage.googleapis.com/golang/getgo/installer_linux
使Golang安装可执行:
$ chmod +x installer_linux
最后,运行installer_linux可执行文件以在您的Ubuntu系统上安装Go。安装程序将下载并安装最新版本的Go:
 $ ./installer_linux
Welcome to the Go installer!
Downloading Go version go1.10 to /home/linuxconfig/.go
This may take a bit of time...
Downloaded!
Setting up GOPATH
GOPATH has been set up!

One more thing! Run `source /home/linuxconfig/.bash_profile` to persist the
new environment variables to your current session, or open a
new shell prompt.
根据安装程序的提示,运行source命令以更新当前的shell会话变量以包括新的GOPATH,或者只是打开一个新的shell会话:
$ source /home/linuxconfig/.bash_profile
检查go版:
$ go version
go version go1.10 linux/amd64
最后,作为测试,尝试获取并执行Golang的hello world示例:
$ go get github.com/golang/example/hello
$ hello
Hello, Go examples!
(adsbygoogle = window.adsbygoogle || [])。push({});
使用Golang安装程序在Ubuntu系统上安装Go的缺点是我们无法选择安装版本。但是我确定这只是暂时的挫折:
$ ./installer_linux -i
Welcome to the Go installer!
Would you like to install Go? Y/n [Y]: y
The latest go version is go1.10, install that? Y/n [Y]: n
Aborting install.
从Ubuntu邮局安装Go
在Ubuntu 18.04上安装Go的另一种方法是使用apt从Ubuntu存储库安装Go二进制文件的命令:
$ sudo apt install golang
这将安装最新的传统软件包,在撰写本文时go version go1.10:
$ go version
go version go1.10 linux/amd64
在执行测试之前,我们首先需要设置GOPATH:
$ echo 'export GOPATH=$HOME/go' >> ~/.bashrc
$ echo 'export PATH=${PATH}:${GOPATH}/bin' >> ~/.bashrc
$ source ~/.bashrc
执行一个go预编译的hello world的命令测试:
$ go get github.com/golang/example/hello
$ hello
Hello, Go examples!
使用snap安装Go
在本节中,我们将使用以下命令在Ubuntu 18.04上执行Go的安装:snap命令。使用snap在Ubuntu 18.04上安装Go如下所示linux命令:
$ sudo snap install go --classic
go 1.10 from 'mwhudson' installed
检查安装的版本:
$ go version
go version go1.10 linux/amd64
接下来,设定GOPATH:
$ echo 'export GOPATH=$HOME/go' >> ~/.bashrc
$ echo 'export PATH=${PATH}:${GOPATH}/bin' >> ~/.bashrc
$ source ~/.bashrc
最后,要测试安装,请使用go下载并执行Hello World示例的命令:
$ go get github.com/golang/example/hello
$ hello
Hello, Go examples!
(adsbygoogle = window.adsbygoogle || [])。push({});
或者,snap命令允许您选择要在Ubuntu系统上安装的Go版本。以下命令将列出所有可用的Go版本:
$ snap info go
name:      go
summary:   Go programming language compiler, linker, stdlib
publisher: mwhudson
contact:   This email address is being protected from spambots. You need JavaScript enabled to view it.
				document.getElementById('cloak5c5caad5d3b1db119e0b0e112d3a271a').innerHTML = '';
				var prefix = 'ma' + 'il' + 'to';
				var path = 'hr' + 'ef' + '=';
				var addy5c5caad5d3b1db119e0b0e112d3a271a = 'michael.hudson' + '@';
				addy5c5caad5d3b1db119e0b0e112d3a271a = addy5c5caad5d3b1db119e0b0e112d3a271a + 'ubuntu' + '.' + 'com';
				var addy_text5c5caad5d3b1db119e0b0e112d3a271a = 'michael.hudson' + '@' + 'ubuntu' + '.' + 'com';document.getElementById('cloak5c5caad5d3b1db119e0b0e112d3a271a').innerHTML += ''+addy_text5c5caad5d3b1db119e0b0e112d3a271a+'';

license:   BSD-3-Clause
description: |
  This snap provides an assembler, compiler, linker, and compiled libraries for
  the Go programming language.
snap-id:          Md1HBASHzP4i0bniScAjXGnOII9cEK6e
channels:
  stable:         1.10          (1473) 64MB classic
  candidate:      1.10rc2       (1406) 64MB classic
  beta:           ↑
  edge:           devel-86a3389 (1598) 69MB classic
  1.10/stable:    1.10          (1473) 64MB classic
  1.10/candidate: ↑
  1.10/beta:      ↑
  1.10/edge:      ↑
  1.6/stable:     1.6.4         (122)  49MB classic
  1.6/candidate:  ↑
  1.6/beta:       ↑
  1.6/edge:       ↑
  1.7/stable:     1.7.6         (324)  48MB classic
  1.7/candidate:  ↑
  1.7/beta:       ↑
  1.7/edge:       ↑
  1.8/stable:     1.8.7         (1407) 51MB classic
  1.8/candidate:  ↑
  1.8/beta:       ↑
  1.8/edge:       ↑
  1.9/stable:     1.9.4         (1404) 55MB classic
  1.9/candidate:  ↑
  1.9/beta:       ↑
  1.9/edge:       ↑
例如,bellow命令将安装Go 1.7稳定版:
$  sudo snap install go --channel 1.7 --classic
go (1.7/stable) 1.7.6 from 'mwhudson' installed
$ go version
go version go1.7.6 linux/amd64
(adsbygoogle = window.adsbygoogle || [])。push({});
入门Go示例
让我们通过在其中创建一个新目录来开始一个新项目~/go/src/。我们将其称为linuxconfig项目:
$ mkdir ~/go/src/linuxconfig
使用nano或任何其他文本编辑器编辑新文件linuxconfig.go:
$ nano ~/go/src/linuxconfig/linuxconfig.go
在编辑模式下,输入以下Go代码:
package main

import (
        "fmt"
        "github.com/golang/example/stringutil"
)

func main() {
        fmt.Println(stringutil.Reverse("gro.gifnoCxuniL gnitisiv rof uoY knahT"))
}
编译并安装新的二进制文件:
$ go install linuxconfig
运行Golang二进制可执行文件:
$ linuxconfig
Thank You for visiting LinuxConfig.org

