目的
目的是使用VSFTPD守护程序在Ubuntu 18.04 Bionic Beaver上设置FTP服务器。
操作系统和软件版本
- 操作系统:-Ubuntu 18.04仿生海狸
- 软件:-vsftpd:版本3.0.3或更高版本
要求
以root或通过特权访问Ubuntu系统sudo命令是必需的。
困难
简单
约定
使用说明
VSFTPD安装
首先,步骤是安装VSFTPD守护程序。打开终端并输入:
$ sudo apt-get install vsftpd
配置FSFTPD服务器
在执行任何操作之前,让我们备份当前的FSFTPD服务器配置文件:
$ sudo mv /etc/vsftpd.conf /etc/vsftpd.conf_orig
创建一个新的VSFTPD配置文件/etc/vsftpd.conf使用您喜欢的文本编辑器,例如:
$ sudo nano /etc/vsftpd.conf
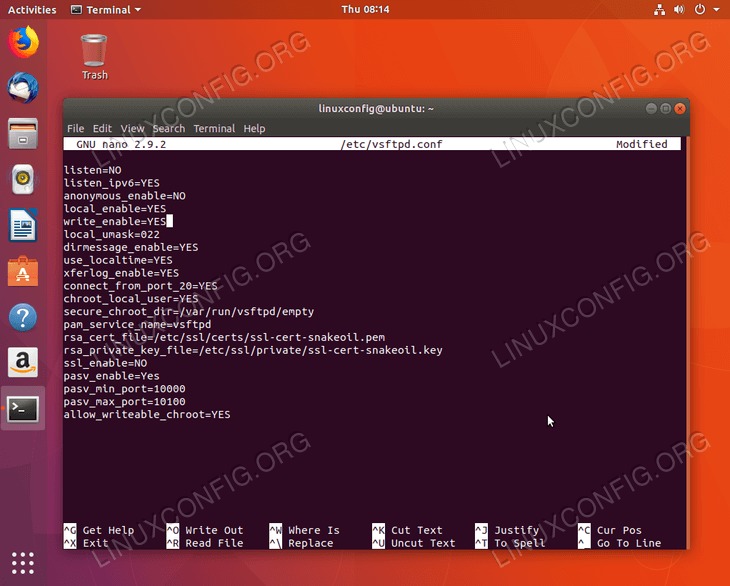
我建议您从下面的基本FTP服务器配置开始,确认它正在工作,以后再使用fine-tune使其适合您的特定环境需求:
listen=NO
listen_ipv6=YES
anonymous_enable=NO
local_enable=YES
write_enable=YES
local_umask=022
dirmessage_enable=YES
use_localtime=YES
xferlog_enable=YES
connect_from_port_20=YES
chroot_local_user=YES
secure_chroot_dir=/var/run/vsftpd/empty
pam_service_name=vsftpd
rsa_cert_file=/etc/ssl/certs/ssl-cert-snakeoil.pem
rsa_private_key_file=/etc/ssl/private/ssl-cert-snakeoil.key
ssl_enable=NO
pasv_enable=Yes
pasv_min_port=10000
pasv_max_port=10100
allow_writeable_chroot=YES
将上述FTP配置行插入/etc/vsftpd.conf文件。
如果您启用了UFW防火墙,请执行以下命令以允许传入流量到FTP端口:
$ sudo ufw allow from any to any port 20,21,10000:10100 proto tcp
有关更多选项的信息,请访问以下页面如何通过UFW防火墙允许FTP传入流量。
全做完了。重新启动VSFTPD服务器以应用新更改:
$ sudo service vsftpd restart
创建FTP用户
在此阶段,我们准备创建FTP用户。以下几行将创建一个新的系统帐户ftpuser:
$ sudo useradd -m ftpuser
$ sudo passwd ftpuser
Enter new UNIX password:
Retype new UNIX password:
passwd: password updated successfully
为了测试目的,在其中创建一些任意文件ftpuser的主目录。登录后,我们应该可以查看和编辑此文件:
$ sudo bash -c "echo FTP TESTING > /home/ftpuser/FTP-TEST"
FTP服务器配置已完成。如果您希望在本地网络以外的其他任何地方使用FTP,则建议您配置SFTP服务器为您的FTP连接增加额外的安全性。
连接到FTP服务器
到目前为止,所有内容都应该为用户准备就绪ftpuser连接并登录到我们的新FTP服务器。鉴于您可以通过主机名解析新的FTP服务器ubuntu-ftp你可以使用ftp登录命令:
$ ftp ubuntu-ftp
Connected to ubuntu-ftp.
220 (vsFTPd 3.0.3)
Name (ubuntu-ftp:lubos): ftpuser
331 Please specify the password.
Password:
230 Login successful.
Remote system type is UNIX.
Using binary mode to transfer files.
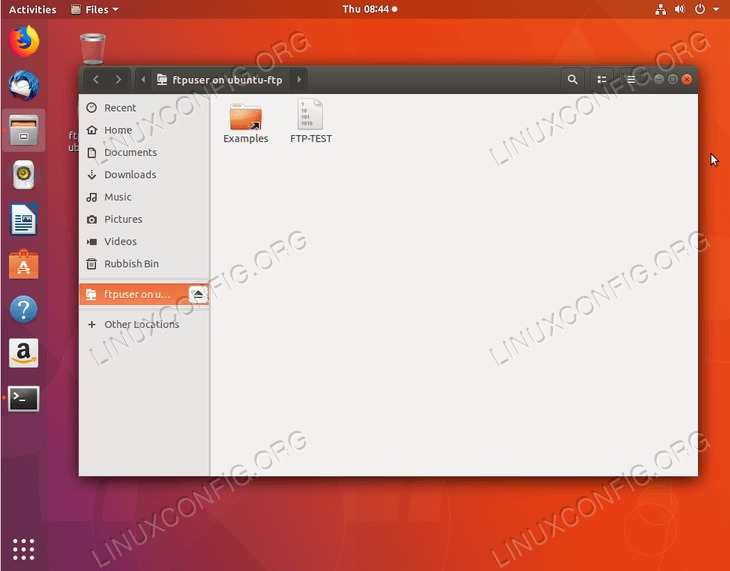
ftp> ls
200 PORT command successful. Consider using PASV.
150 Here comes the directory listing.
-rw-r--r-- 1 0 0 12 Feb 15 08:34 FTP-TEST
-rw-r--r-- 1 1001 1001 8980 Apr 20 2016 examples.desktop
226 Directory send OK.
ftp>
或使用任何GUI FTP客户端建立FTP连接。最简单的方法是使用应已安装在系统上的Nautilus文件管理器:

打开Nautilus并单击Other Locations。输入ftp://FTP-SERVER-HOSTNAME-OR-IP-ADDRESS然后点击Connect。
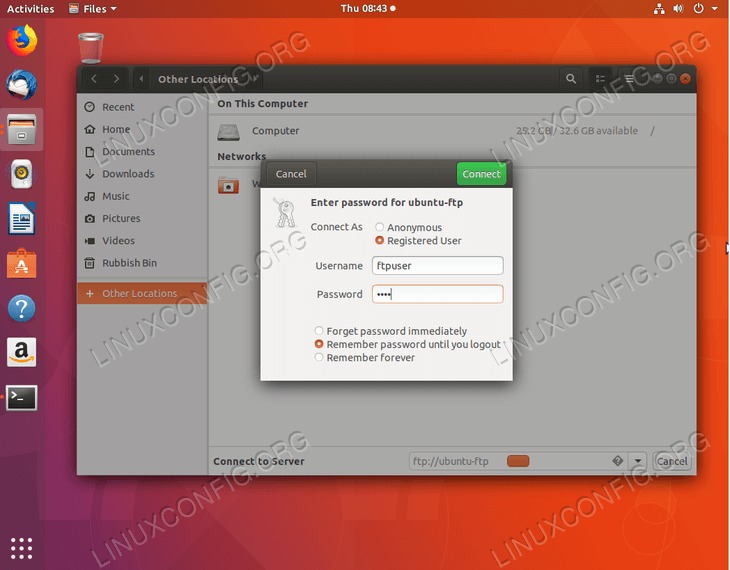
输入FTP用户的凭据。